Friday, 4 December 2015

Dropping Wood

Before we moved to Normandy, I probably would've found it difficult to listen to anyone tell me about appropriate wood felling, coppicing without wincing at the thought of a tree being simply chopped down. Regardless of the intentions of the person. But to manage your primary energy source, you must become a woodsman. By learning how to properly coppice, wood can become a fully sustainable energy source.
This small area in our woodland is about 20 metres across and 60 metres from top to bottom.  In order for the previously fell trees to properly coppice we need to remove as many of the big "blocking" trees otherwise the coppicing won't really take place and it would have all been a waste of time.  Our target trees today were these two above dead centre of the picture.
What we are trying to do is remove all the canopy so that light can get to the forest floor.  This time of year there is little to no foliage and plenty of light gets down, but nothing is growing.  Once spring comes it's a rush to suck up that beautiful life-giving yellow warm stuff from the sun.  In the picture above, pretty much all the trees will need to be removed in order to put this area into coppice rotation.
So two old fellas start by making a wedge in our target tree.  We want to encourage to fall to the right, down the hill and between some trees at the bottom... fingers crossed.
Then we get out the cross-cut saw, this one is 4-feet across and make a cut slightly above the centre point of your wedge.  You continue to cut until the tree starts to make cracking noises, then remove yourself pretty quickly and watch your tree fall exactly where you thought...

On this occasion you can see the tree did in fact fall down slope and between the trees, ding, ding, ding!

The second tree offered us a rare opportunity to retreat from the tree, it was teetering and ready to fall, grab the phone and film it fall... EXACTLY where you hoped it would...
Then have a well-earned cup of tea.
And enjoy the silence... turn up the sound and you may just hear the stream at the bottom of the valley.  Oh and by the way volunteers are always welcome.

Thursday, 3 December 2015

Autumn/Winter 2015 Update

A quick update for all you permies out there. The last couple of months have been challenging as I have been unable to get rid of an elbow injury, meaning I have been about as useful as a chocolate teapot! Doesn't mean nothing happens. Winter sculpting is well in progress with Andy and our long-term WWOOFer, Remi, picking up the slack from my disabled arse!
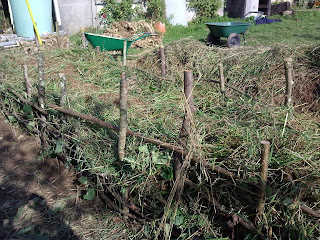
We need more hedgerows to break up the wind... So we have scythed a load of grass... laid out wood from a recently coppiced hazel (see pictures below) and covered with aforementioned grass.
This baby hedgerow will be planted with a variety of trees and shrubs over the winter.
Water is of upmost importance as we want to encourage predators to our land in the shape of frogs and toads.  Also we'd like some ducks to compliment our growing menagerie of animal helpers.  Freya offers us some context here so you can see how deep it is.
We get down to the woodland as often as we can.  This is dictated by the weather as felling trees is difficult in windy conditions.
This was last week, early morning fog was rolling up the valley from the stream.  It was peaceful and pretty.

The Kelly kettle is an essential piece of kit to help keep hydrated. 
At the Yurt-end of the main field, Andy needs additional protection so has sculpted some rough beds and transplanted a number of small trees from our nursery.  Over time this should form a formidable barrier.

Remi has been continuing to work on some interesting Hügelkultur beds.  Updates over the coming years will illustrate their importance and utility.

We are focusing our felling on a previous site that we did not clear completely.

Proper coppicing will only work effectively if you clear enough of the canopy to allow new growth from your coppiced stools.

This was one of our small fields we had let our voisine (neighbour) use.  They have sadly moved  to Ferte Mace, with work, so Remi has been utilising the cultivated space for a "hidden" garden... his words not mine.  The key thing is to heavily mulch to prevent weed regrowth.  This year we will be mulching like mad men.

It's incredible how much wood can be cultivated from properly managed stools.  This hazel stool had not been cut in a number of years, but with this new haircut should regrow beautifully.
This basically sets the pattern for the next 3-months.  A lot more felling, wood is our primary source of energy and a lot more landscaping.  The additional help of a WWOOFer has certainly allowed us to push ourselves, next calendar year we will hopefully have the accommodation to have more than one!

Saturday, 24 October 2015

Hügelkultur @ La Fieffe

Hügelkultur (Hoo-gul-culture) is a raised bed composting system, built on the top of decaying wood and other compostable biomass materials.  The term Hügelkultur, comes from the German for hill or mound culture and has been practiced in Eastern European culture for hundreds of years.
Hügelkultur attempts to mimic the process of decomposition of trees in a forest environment.  Over time the wood breaks down and becomes almost sponge-like soaking up and retaining water.  The area near the bed is nutrient rich has improved soil fertility, better water retention and significantly warmer soil, improving plant growth on or around it.  Furthermore it is raised so that those with lower mobility (the parents as they age, especially Mum with her knees!) can more easily access the food growing on it.
Image result for hugelkultur
Being experimental gardinistas (revolutionary permaculturalists!), we are building a number of different Hügelkultur beds at La Fieffe, located in different areas, some dug into the ground some above ground to test their effectiveness.  This could take some time as the decomposition process continues for a number of years but we will post how they do in the Normandie environment.

So lets take you through the construction process.

 Firstly a sunken Hügelkultur bed.  Dig out all the nasty box hedge, stand back and admire your work.
 Fill the hole with wood of differing sizes.
 If you have compost (we do) fill the gaps with some of this lovely worm-created soil.
 Add more biomass, in this case off-cuts from the prior destruction of hedgerow.
 Cover with some soil that was excavated from the hole.
 Top dress with grass to act as a mulch, keep adding this over the winter period to build more biomass.
 Alternative to the above, you can create the bed on top of the surface.
 The same steps as above, wood, compost and other biomass.
 As it's above ground perhaps some stakes...
 ... and jauntily weaved hazel sticks.
 Again lasagna the layers.
 More weaving to hold all the stuff together.
Finalise with grass.
 Both beds should be good to receive some plants in the spring and for the foreseeable future.  Self-fertile, good aeration and good moisture retention.  Have a go, share your results, satisfy permaculture principal, Care of People!

Thursday, 15 October 2015

Insect (Bug) Hotel

What do you do when you don't want to do any "adult" chores. Come up with a child-friendly project that you can get everyone involved in doing. This is our attempt at a bug/insect hotel.
Step 1: Plan something simple, then quickly allow it to become overly complicated and stressful as you struggle to find materials to meet your complex structure needs!
 
Step 2: Listen to your clever wife and use the slats from your old bed that are stored in the barn and construct a basic frame.
 Step 3: Having not thought it through very much, listen to further advice from your brother and wife and ensure the width isn't too great and stand up against the south-facing wall of the house.
 Step 4: Randomly insert levels with no real thought as to what will be placed on each.
 
Step (where are we up to?) 5: Forage for all manner of natural equipment that might not look out of place in a bug hotel.
 Step 6: Drill some holes in wood for the little critters to be able to use as accommodation.
Step 7: Give up drilling holes of differing sizes in the wood as you can't get the drill bit out of the rapidly heating SDS Drill 
Step 8: Start bunging things on the shelves and make it look rural and jaunty!
Step 9: Get more people involved so as to be able to blame them for any cock-ups that you may have made up to this point. 
 Step 10: Throw some food and forage type things in there.
Step 11: Add some colour, for the wife and two daughters, they like pink! 
 
Step 12: Have the chickens come over to inspect. 
 
Step 13: Chase chickens away as they keep nicking the corn. 
 
Step 14: Voila, you have constructed your first Bug/Insect Hotel... Good job!
Some serious stuff about building these structures.  All joking aside, these are fun, simple and important structures especially for creatures like solitary bees.  Give it a go, post your pictures on social media and inspire others.
https://en.wikipedia.org/wiki/Insect_hotel
http://www.rspb.org.uk/makeahomeforwildlife/advice/gardening/insects/building_homes.aspx
http://www.bbcwildlife.org.uk/sites/birmingham.live.wt.precedenthost.co.uk/files/Insect%20Hotel.pdf